Hello Friends,
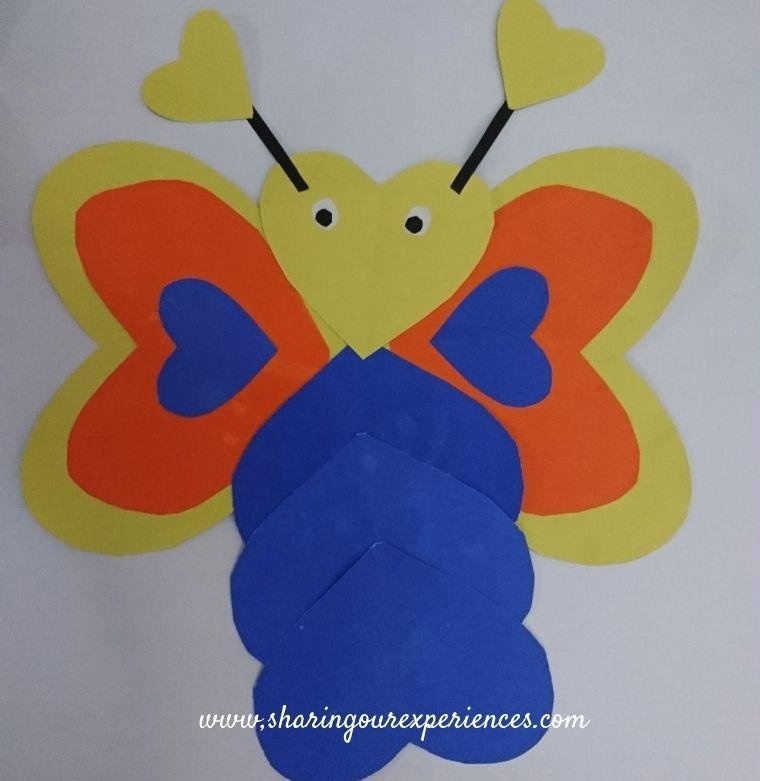
Today I am going to talk about how we (my toddler who is around two years old and me) made a colorful butterfly using hearts (colored paper cut out in Heart shape).

We have our walls covered with butterfly stickers and flowers and my toddler loves pointing to them. So one day while thinking of what to make, I found this idea on Pinterest. I loved it on first look and wanted to try it.
We also love reading The hungry caterpillar by Eric Carle and how a caterpillar turns into a beautiful butterfly. So this activity can also be done as a continuation to book reading.
By the way if you do not have the book yet, get it. I think your toddler will love it. If not reading then at least inserting fingers through the holes of that book. Its one of the classics that you must have. If you are looking for more book recommendations then do go through this list of books for babies first library.
So lets gets back to how to make DIY butterfly using hearts 🙂
Materials Required to make a DIY Butterfly using Hearts (cut and paste Craft)
- Coloured papers (Orange, Yellow, Blue)
- Glue stick/Fevicol
- Black and white paper for eye and antennae’s, you can also use a Googly Eye
- A pair of scissors
Process to make a DIY Butterfly using Hearts (cut and paste Craft)

1) From the yellow paper, cut a heart shape. This will serve as the head of the butterfly.
2) Now cut a pair of comparatively bigger heart shape (2 hearts) from yellow paper, this will serve as two wings of the butterfly. You can decorate the wings of butterfly using 2 Orange hearts and 2 Blue hearts as shown in picture.
3) From the blue paper cut three hearts of the same size and this when stuck as above will form the body of the butterfly.
4) For the antenna cut two black strips and two yellow heart shapes and stick to the head of the butterfly. For eyes you can use black and white paper or googly eye.
5) I was scared that my toddler will mouth googly eyes so have used paper.
Well, our DIY butterfly is ready :-). hop over to this website
Note – For toddlers and kids who have not yet learnt how to use scissors,  you will need to do the cut out and you can take their help in pasting. For older kids they can cut shapes on their own.
In this craft I have done the cutting and my toddler has helped me in deciding what colours to use and applying glue stick on all pieces. Working together gives us an opportunity to talk about various colours, shapes and in this case a butterfly 🙂 ..
I have not been able to take many pictures of the process as doing crafts with a toddler in itself is a big thing. Taking out a phone to click picture will mean him crying for phone instead of working with me.
Why this DIY cut and paste craft is good for your child’s development apart from keeping him engaged
These DIY cut and paste crafts activities are good for improving fine motor skills, eye hand co-ordination and concentration. If you are looking for more ideas on how to keep your two year old engaged do check out Games, activities and Toys for two years old.
Liked this post?
You may also want to try a DIY colour matching activity – A colorful rainbow wheel with cardboard and felt pieces with your toddler
Your Turn Now
In case if you liked this article do show your support by sharing this article.
Like our Facebook Page
Stay connected with us using your favorite social media, we can be found on
Add a comment
Do let me know if you make such a craft with your little one and also how did you use it, using comment below. Would love to hear from you.


